Wednesday, October 31, 2012

Happy Birthday, Nevada!


Today Nevada turns 148 years old.  I bet most of you didn't know that.  So, what does living in Nevada mean to me?  It's taken me quite some time to come to appreciate Northern Nevada and what it has to offer.  I started out in the Lake Tahoe area and, of course, that needs no explanation at all!   Who wouldn't want to wake up to that gem everyday?  Lake Tahoe is one of the most beautiful areas in the world.

The first time I set foot in the Reno area, though,  I thought someone picked me up and put me into a Western movie set.  I wasn't prepared to "go Cowboy" especially since I was a transplant from the Southern California beaches.   Life has a funny way of humoring you.  Three years later I was living in the Reno area and not loving it.  But, looking back..it was the people not the area that made living there a pleasure.

After many years and a few derails, I still find myself in Northern Nevada.  I look for the beauty on a daily basis during my walks and for the most part I'm ready to photograph all the gorgeous vistas.  Hubby and I developed a routine for a long "hike a week" over the Summer time and discovered some very special secret hideaways.  

There is an abundance of hiking trails just minutes from our house and too many to mention a few miles or hours ride from here.  We plan to cover more territory next Spring/Summer or when the weather allows.  Until then...enjoy the day....cherish the people around you....and look closely at your surroundings.  You're probably right where you need to be at this point in time.

Now for some pictures!
sunset

sunrise

Tahoe - Sand Harbor beach

Tahoe Meadows hike

Outside my door!

Davis Creek area

Heavenly sunset

Change of Season down the street

Sunday, October 28, 2012

Rice Pilaf


In the last 2 years since I've been writing this blog I've never made this rice pilaf!  This was almost a staple in my home starting 30 years ago.  How can that be?  Lately I've been compiling, sorting, revising, reviewing, testing and listing certain recipes that are worthy of starring in "the book".    It's a tedious process but some one's gotta do it!

So, the list of recipes gets longer and there's so many more favorites.  This rice pilaf was originally made by my parents and we'd have it as a side dish on many a Sunday dinner at Grandma's.  It's recently been lightened up when it comes to how much butter I use.   It's true, "Everything tastes better with butter", but I always envision what it's doing in my arteries!   Yikes!

Serves 6

Ingredients:

4 Tbsp butter

1 cup vermicelli coils or Fideo, broken apart

2 garlic cloves, chopped

1/4 tsp garlic powder (can't have enough garlic, right?)

3/4 - 1 cup white rice, basmati preferably

1 can (14.5 oz) of beef broth, fat free, reduced sodium

6 oz. water

1/8 tsp salt

In a large skillet (that has a lid), melt butter on medium, add the vermicelli and stir constantly until lightly browned.  Add the garlic cloves, powder, and rice stirring as you go.  Add the broth, water and salt.  Bring to a boil and then reduce the heat to simmer.  Cover and cook until done, about 30 minutes.  Depending on the weather keep an eye on it so the water doesn't evaporate too quickly.   Add a bit more water if it does.  Fluff with a fork and serve.  Delicious!

Friday, October 26, 2012

Homemade Gourmet Croutons


Why would anyone go through the trouble of making their own croutons?  Isn't it easier to just pluck them from the grocery store shelf?  It may be more convenient, but, have you read the back of the label, lately?  What's that sodium content?  And what were you going to do with that days old french bread, anyway?  Toss it?   Would you throw away a dollar bill?  Didn't think so!

It only takes a few minutes to create your own gourmet croutons.  I'm SURE you have the ingredients handy waiting for the bread to get hard.  Try this at home.

Home Made Croutons

1 1/2  cups of French bread, cut into cubes, crust and all

1 Tbsp olive oil

1 Tbsp butter

salt and pepper

seasoning of your choice (garlic, rosemary, herb de Provence are my favorites)  I usually use 1/2 to a full teaspoon of herb sprinkled in.

Melt the oil and butter in a skillet.  Throw in the bread cubes stirring briskly.  When they begin to brown add the salt and pepper and seasoning of your choice.  Done!  If you like them really crunchy , lay them out on a cookie sheet and place in the oven on very low heat for a bit.  Pop one in your mouth to test.  You be the judge!

Use for soups or salads.  They are so much better than packaged "salt cubes"!  This recipe can be easily doubled, do the math.

Here's a label of a best selling packaged crouton, if you're curious.


Ingredients:
Enriched Wheat Flour [FlourBarley Malt, Ferrous Sulfate (Iron), B Vitamins (Niacin, Thiamine Mononitrate (B1), Riboflavin (B2), Folic Acid)], Water, High Fructose Corn SyrupPartially Hydrogenated Soybean Oil, Garlic Powder, Salt, Romano CheesePowder (Pasteurized Skim MilkCheese Cultures, Salt, Enzymes, Sodium Phosphate). Contains 2% or Less of: Onion Powder, Yeast, Blue Cheese Powder (Pasteurized Skim MilkCheese Cultures, Salt, Enzymes, Sodium Phosphate), Spices, WheyHydrolyzed Soy ProteinAnchovy Powder, Autolyzed Yeast, Dehydrated Parsley, Natural and Artificial Flavors, Vinegar Powder, Citric Acid, Dough Conditioners (Calcium Iodate, Calcium Dioxide), Calcium Sulfate.


WHAT IS THIS!

Tuesday, October 23, 2012

Not Your Mother's Liver and Onions


I doubt that this will be the most viewed post!  Liver and Onions, are you kidding!?  But, before you tune out give this dish some credit.  Liver packs a wallop when it comes to helping with iron deficiencies.  I know, I've been on the anemic side and was told to eat spinach and liver.  That's right..doctor's orders.  I admit, though, I'm not a fan of beef liver.  It has to be chicken liver.

Growing up, my mom would make liver as often as she could, and she got away with it quite often!   She loves liver to this day!   In my teens I had an abundant  supply of chicken livers since I worked at Kentucky Fried Chicken.  My cat loved me because I always smelled like chicken when I arrived home from work.  He didn't eat liver but he got his fill and more of chicken breasts, his favorite!

My recent quest to disguise/transform liver into something gourmet led to this liver, onion and apple recipe.  Enjoy!  Or at least try to!

Ingredients:

3-4 slices of pancetta , diced (bacon can be substituted)

1/2 yellow onion, thinly sliced

1 apple, peeled and sliced

5 button mushroom, sliced

2 small garlic cloves, chopped

1 container (3/4 lb) of chicken livers, drained,  rinsed and cut into bite size pieces

1/4 cup white wine

1/4 cup chicken broth or water

1 fresh sage leaf, minced

2 Tbsp. parsley, chopped

In a large skillet cook the pancetta as you would bacon.  Remove to a paper towel to drain but save the drippings.  Add the onion to the drippings and cook on medium to soften.  Then add the apples,   mushrooms, and garlic, cooking until soft.   Remove from the pan and set aside.

Cook the liver in the same skillet with the remaining drippings.  Stir often as you cook until browned, yet still a bit pink.  Add the pancetta, onions, apple, mushrooms and garlic back in.  Add the the wine and chicken broth, sage and 1 Tbsp of the parsley.  Now, simmer this on medium for about 5 minutes, until the liquid evaporates leaving a nice light sauce.

Garnish with remaining parsley.  Serve over rice or pasta or by itself.  Delicious, I promise!


Saturday, October 20, 2012

Creamy Cheesy Cauliflower Soup


Our first snow of the Season is predicted for early next week!  Temperatures ranging from mid 80's  during the day to almost freezing at night.  That's Northern Nevada for you.  When the weather gives us this Wintery mix, there's nothing better than brewing some hot steamy soup to warm the old bones and sooth the soul.

I've tried different recipes for cauliflower soup.  Some spicy, some bland,  and some with roasted cauliflower.  My mother used to make cauliflower with cheese sauce years ago so I guess I'm trying to achieve those exact flavors.  Not there yet, but until then, this cheesy cauliflower soup was pretty tasty.

Ingredients:

3 cups raw cauliflower florets

3 cups chicken broth

2  pieces of sliced leeks (3-4 inch pieces of the white end), washed or 1 3/4 cup of the same

2 garlic cloves, chopped

1/2 tsp herb de Provence

1/8 tsp cayenne

dash of salt

Cook all ingredients in a large pot on medium high heat until cauliflower is done.  This may take about 15 minutes.  Puree the soup in batches in the blender and add back into the pot.

Add approximately 4 oz. of any good melting cheese such as cheddar, fontina or smoked Gouda (this is what I used).  Stir often on low/med heat.  When the cheese has melted, time to serve!

Wednesday, October 17, 2012

Sweet Potato Gnocchi - Pasta of the month


I'm just a pasta making machine and loving every moment!  This ambitious endeavor has always been on my "bucket list" of things to do. If you're a cook like I profess to be, a trip to Italy will launch your cooking skills.  Inspiration is everywhere.  The fresh pasta and ingredients are in every trattoria, bistro or restaurant.  They even have amazing food at the auto strata eateries which look like a large 7-eleven from the outside but far, far from it as you enter.  So how do you savor the flavors of those places?  You make pasta!

My "pasta of the month" is sweet potato gnocchi from scratch.  To me, it's the starting point for pasta making.  If you can play with play dough, you can make gnocchi.  And there is nothing better than fresh pasta. This recipe makes over 100 little pillows of goodness.   I needed to use my new toy, a gnocchi board.  I'm still working on technique but with the right amount of pressure I'll have these babies looking machine made, perfetto (perfect).

Ingredients:

1 1/2 cups sweet potato 

2 cups flour + more for rolling and shaping

1 egg

1/2 tbsp salt for cooking water

Microwave the potato, skin and scoop out to measure.   Place chunks in a large bowl, mash with a fork or masher and cool a bit before mixing with flour.

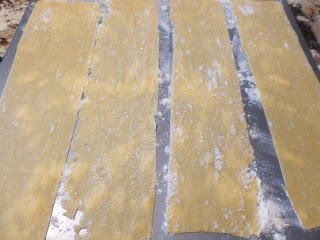
Stir in the flour 1/2 cup at a time until the dough forms.  You may not need all the flour.  The dough should be soft. 

Now stir in the egg and mix well.  If it's on the wet sticky side, add more flour (1/2 cup or so).  Divide the dough into 4-6 pieces. On a surface sprinkled with flour,  roll each piece like you're making a long snake about 1 inch in diameter and as long as the dough will take you.  Then cut into 1/2 inch "pillows" (pieces).   If you happen to have a gnocchi board lying around use it to make the ridges.  A fork can do the same thing or you can leave them without the ridges (more rustic)  As you make each piece place them on a pieces of parchment paper on a baking sheet or surface.  Repeat the gnocchi making until the dough is gone.  I estimate that you'll have well over 100, possibly around 120!!


roll and cut


form with board


ready to freeze or cook

You now have the option of freezing them for a later time.  Just place the gnocchi filled baking sheet directly into the freezer for about an hour or two.  When frozen you can put them in freezer bags.  It will take slightly longer to cook the gnocchi in a frozen state and no need to defrost.

To cook that day:  Bring a large pot of salted water to boil.  Put the gnocchi in but don't crowd them.  When they rise to the top (usually in 1 minute or less), they're done.  You can do this in batches.  Have the melted butter or browned sage sauce waiting in another pan or pop into a warm oven as you make more.

When it comes to how many per serving....how hungry are you?  Between 15 and 20 is a sizable portion!  I guarantee that these will melt in your mouth!


Sunday, October 14, 2012

Lasagna - A Work in Progress


I don't know what I'm trying to prove sometimes.  I heard the words come out of my mouth, "I'm making lasagna from scratch, from the sauces to the pasta sheets".  I was mortified!!  Now, I just had to follow through.

When all was said and done, and eaten, the jury was in from all my "birthday" taste testers.  The room got extremely quiet (always a good sign as everyone filled their mouths and bellies with the lasagna).  I'm always my worst critic.  The pasta noodles were wonderfully soft, the bechamel great, but next time I'll reduce the amount.  

The Bolognese sauce will, again, be revised.  Maybe just my simple marinara, huh?  I'll add my hubby's favorite spicy Italian sausage back in.  And last but not least, I may hire a kitchen clean up crew!  It took me longer to clean up the kitchen than it did to make noodles from scratch!

kitchen help needed!

more dishes


bechamel ready

ready for pasta making

pasta before kneading

ready to roll!

ah...finito!  time to assemble!

Was it worth the trouble?  Of course!  I found the act of pasta making to be relaxing (I know that's warped thinking!), but true.

It was not Zeno's lasagna from Costa Rica, but it's getting very close!  Sorry, no recipe until the process is complete!

Thursday, October 11, 2012

My Marinara


You've all probably heard of sauce referred to as Marinara, tomato, pomodoro. puttanesca, Bolognese, Sunday gravy, etc, etc.  I'm sure the list goes on.  Marinara is a simple tomato sauce I use for a quick sauce, one that doesn't require  hours to cook.  Depending on the region of Italy you come from, or how you want to use the sauce, will depend on what recipe you'll use.  Or, maybe, you have a "secret" family recipe that has been passed down for years.

Then there are those of us who had to travel to Italy to finally "get it", come home and start to experiment in the kitchen to get it right.  Or travel to Costa Rica, of all places, to have the BEST lasagna on the planet.   After years of trial and error with sauces I made this one recently to go on some fried eggplant.  So, as far as Marinara goes, I'm done.  Sunday sauce or a good Bolognese is still being "developed".

Now, I do have a great sauce recipe from family, but if I posted it, I'd have the mafia coming to break both my arms!  (just kidding, I hope) Until another time....enjoy this simple marinara.

Ingredients:

1/4 cup olive oil

1/2 medium onion, chopped

4 garlic cloves, sliced

28 oz. can of diced or whole tomatoes, cut up

1 Tbsp dried oregano  (next time I will omit this, don't much care for oregano)

1 handful torn up fresh basil

1 package of truvia sweetener (or use sugar)

1 tsp salt

1/2 cup tomato paste

1/4 - 1/2 cup red wine

In a large pot, heat the oil, add onions and cook until soft.  Add the garlic, stir for a minute, then add the tomatoes, oregano, basil, truvia , salt, tomato paste and wine.  Stir well, bring it to a slow boil, cover loosely, and reduce the heat to low.  Simmer on low for about 30 minutes or longer.

Pour sauce into a blender and puree to the consistency you want.  You can also leave some chunks in your sauce if you like that.  You're in control!  Now adorn your eggplant or pasta with this marinara.  Mangia! (Eat!)

Note:  The top picture is before it went into the blender.

Marinara on zucchini and eggplant

Monday, October 8, 2012

Zucchini Patties


Is your  kitchen counter overflowing with zucchini, yet?  Mine is, but I don't mind.  There's so much you can do with this vegetable!  I've been hiding it in bread, cake, assorted vegetable dishes and now the classic zucchini patties.  At least they were a classic in my home for many years.

I've pretty much thrown ingredients together over the years, sometimes getting good and some bad results.  The most important thing you can do to insure the best result would be to press all the liquid you can from the grated zucchini.  If you don't, they will ooze and run all over the place.  These zucchini patties were moist on the inside, yet crispy on the outside.  So, if you're searching for another zucchini recipe, try this one.

Ingredients:

2 cups grated zucchini, liquid drained

1/4 cup diced onion

2 Tbsp flour

1 tsp garlic powder

1 Tbsp either plain Greek yogurt, mayo or an egg  (use what you prefer.  I used Greek yogurt this time.)

salt & pepper to taste

 For the coating:

1/2 cup seasoned bread crumbs

1 small egg

For the pan:

a combination of 1 Tbsp olive oil and 1 Tbsp of butter

In a bowl mix the zucchini, onion, flour, garlic powder, salt and pepper.  Stir in either the yogurt, mayo or egg.  The mixture should be stiff enough to form a patty.  It may help to moisten your hands with a bit of water first.  Yes, it is messy!  As you make each patty, gently set them onto a sheet of waxed paper.  These patties were roughly 2 1/2 inches in diameter.  The recipe makes about 6-8 patties depending on size. 

In 2 different pie plates or shallow dishes, put the bread crumbs in one and the beaten egg in another.  Heat the oil/butter combo in a large skillet.  Turn up the heat to medium and gently start to dredge the each patty in egg first, then coat with breadcrumbs.  Quick note for first timers:  You may want to coat them ALL first and lay them back onto the waxed paper if you can't work quick enough.

Cook on the first side for about 6-8 minutes, turn and continue to cook for about the same time.  The coating will get quite brown but not to worry.  They're really tasty.

Friday, October 5, 2012

Fruity Homemade Granola


I've been known to make some healthy food around here.  It's not all pasta and desserts.  Usually I'll cook mostly veggie concoctions and chicken or fish until my hubby has a hankering for a hunk of meat!  

This granola recipe was adapted from Heidi Swanson's book called, "Super Natural Cooking".  My almost daughter-in-law loaned it to me for inspiration.   I scaled back the amounts to make half a batch.  Although I've made granola before, this batch was hands down more flavorful than the one of the past.  It's a keeper!  Delicious by itself or as a topping with yogurt.

Ingredients:

2 cups rolled oats

1/2 cup chopped nuts.  Any assortment will do.

2/3 cup raw unsalted sunflower seeds, shelled of course

1/2 cup unsweetened coconut flakes

3/4 cup dried fruits.  I used dried blueberries,  chopped mango and chopped pineapple.

1 tsp of  ginger root zest

1 tsp of  orange peel zest

1/2 cup honey

1/8 cup coconut oil

Preheat oven to 300 degrees.

In a large bowl combine the oats, nuts, sunflower seeds, coconut, dried fruit, ginger and orange zest.  Stir to blend.  In a small saucepan heat the honey and coconut oil on low heat a few minutes until it thins out.  Pour this over the oat mixture and mix well until coated.  Spread onto a baking sheet (cookie sheet) and bake for a total of 40 minutes.  During this time stir every 10 minutes.  Cool and store.

Tuesday, October 2, 2012

Welcome Un Caffe to Reno


I now have a new "favorite place"  for Italian food.  If I lived in one of those hill towns you see in all the Tuscany pictures, you know the ones with rolling hills and cypress trees dotting the landscape, this would be my regular "hangout" as far as an Italian bistro goes.  Whether you're looking for breakfast, lunch or dinner, Un Caffe fits the bill!  Check out my Reno/Tahoe Reviews page (click above) to find out why.  Mangia...