Showing posts with label blueberry. Show all posts

Friday, August 16, 2013

Blueberry Compote


So what is a compote?  A fancy French word for fruits stewed in syrup!  It's a great way to use those Summer fruits when you've overbought   succumbed to the buy one get one free sales.  There's nothing worse than getting to the middle or bottom of a pint container of luscious blueberries and most of the remaining ones have fuzzy mold on them.  So, instead of waiting for this scenario, bring pints home and either freeze them for later use or make a compote to crown your pancakes, waffles or oatmeal!


Blueberry Compote

1 pint of washed blueberries

2 Truvia packets  (I gotta cut back somewhere)

1/4 cup water

2 Tbsp Cassis liqueur (continuing with the French theme, it's a berry liqueur)

1/4 tsp cinnamon

Add all ingredients to a small saucepan and bring to a boil.  Reduce to simmer and continue to cook stirring at times for about 15 minutes.  Cool and serve or refrigerate to use later.

Monday, July 9, 2012

Panko Pork with Apricot Blueberry Sauce


Sometimes it's just too hot to grill.  With the temperatures reaching into the triple digits this week, why not bring the party indoors, crank on the air conditioner or fans and make this panko pork.  Or you can choose to have what we had for our anniversary dinner last evening.

Earlier in the day we went to the show to see "To Rome with Love".   If you've ever been to Roma, I highly recommend it, just keep in mind it's a Woody Allen movie which, to me, means a little quirky.   As we walked out of the theater, it was as if we were walking into an oven!  A few years ago I made a rule,  "If the temp reaches 100, we must have ice cream for dinner, no cooking, no grilling, etc.  We enforced that wise rule!  (This rule does not apply to Phoenix where you'd be eating ice cream from May thru October)

The temperature from our car read 99, but since it was our anniversary we could justify that missing degree, right?  So, we proceeded to the dinner place, 31 flavors, and packaged up 3 scoops each.   Blueberry cheesecake, Mississippi mud, and Reese's peanut butter cup!  I was in heaven where I know the streets must be paved in chocolate and ice cream!

What does this have to do with panko pork?  Absolutely nothing!  But, it's a great entree if you don't feel like having ice cream!

For the sauce:

3 Tbsp apricot preserves

1 Tbsp balsamic vinegar

1/2 cup blueberries

1 Tbsp cilantro, chopped

Bring all the above to a boil, reduce heat and simmer until it thickens and reduces.  Set aside.

For the pork: 

4 thin boneless chops

salt and pepper

drizzle of  olive oil

about 1/2 cup panko bread crumbs

Prepare the moistened chops sprinkling with salt and pepper, then dip into the bread crumbs.  Lay the chops on a baking sheet, drizzle with a bit of olive oil and bake at 375 for about 20 minutes or until done.

Reheat the sauce, plate the pork and pour sauce over the pork.  Very tasty!

NOTE:  If you don't want to turn on the oven you can put the pork chops in a skillet to cook.

Sunday, May 20, 2012

Dutch Baby Pancake for Momma!


Last Sunday, Mother's Day I rose early.  Not much sleeping in when a cat is in the house!  I decided to fix myself and hubby, of course, a special breakfast.  Most mornings start with coffee and cereal for him and usually an egg or egg white with fruit for me.   On Sundays years ago when my son was small we'd have pancakes or french toast! 

This recipe for a dutch baby pancake was so easy it's scary.  Just mix it all and throw it in the oven, but what a special treat!  Now, I've never claimed to be a morning person and this morning I proved that!  Instead of the "required"  3 eggs I only cracked open two, spaced out a bit and continued with the ingredients!   Should have had more coffee.  The results were still quite good.  It was more of a custard instead of a light pancake. 

Ingredients:

3 Tbsp butter

3 eggs

1 cup milk

1/2 tsp salt

1 tsp vanilla

zest of half a lemon

3/4 cup flour

a dash of cinnamon

1 cup of partially frozen blueberries


Preheat the oven to 450 degrees.  Put the butter into a 10-12 inch oven proof skillet.  A cast iron one is perfect.  Put the pan in the oven while making the batter.

In a blender combine the eggs, milk, salt, vanilla, and zestThen add the flour, and cinnamon and mix.  Take the pan from the oven and pour the batter into it.  Sprinkle the berries on top and bake until puffed.  Around 12-15 minutes.

Garnish with powdered sugar, a dab of butter and syrup.    This is a baby a mother could love!!

such a pretty baby!

Thursday, May 10, 2012

Blueberry Raspberry Cinnamon Cake


A few years ago I wanted to try my hand at berry growing.  I went to the local home/gardening store and picked up a small black raspberry bush and half jokingly planted it in a sunny corner of my yard.  The first year the yield was not too good.  Then, it became "established" and started to thrive.  After learning the ins and outs of proper pruning, I can depend on a nice crop of berries. 

Last year they all seemed to ripen at the same time, right around the time my kitchen was being remodeled.  I quickly packaged and froze a few batches to put into recipes later on.  That "later on" arrived this last week when I made this berry cake laced with cinnamon. 

The only thing I would change on this would be to remove the annoying seeds by mashing and pressing the berries through a sieve first.  Can't wait to try that with this year's crop!  If you can't handle the seeds, just use all blueberries!

Ingredients

2 eggs

1 cup sugar

1/2 cup milk

1/8 tsp salt

1 1/2 cup flour (I used cake flour)

1 Tbsp cinnamon

1 cup blueberries, fresh or frozen

1 cup black or red raspberries, fresh or frozen

a sprinkle of baker's sugar (for topping)

1 Tbsp chopped pecans, optional for topping

a few "dots" of butter

Butter and flour a 9 inch round pan.  Heat oven to 350 degrees.  In a bowl blend the eggs, sugar, milk and salt.  Add the flour, cinnamon and fold in most of the berries.  Save some for topping.  Pour into the pan, add the extra berries, dot with butter and sprinkle with sugar and a little more cinnamon if you want.  Bake for about 55 minutes, until done.  Cool and serve.  Great snacking or brunch cake!


Friday, January 6, 2012

The Best of the Big Island - Part 3


This last "installment" of the Best of the Hawaii, the Big Island has been percolating in my mind for over a month now.  With Christmas and all, it seemed out of place with all those blogging about cookies, cakes and sweets.  But, I'm ready to divulge the BEST with a day trip to volcano country.  Off to Kilauea we go.

Madame Pelee was in a very good mood that day.  The lava was not flowing like you see in all the pictures, however it was spewing a bit of ash and smoke.  If we had gone another 1.5 hours drive toward the ocean we might have been able to view the lava flowing into the ocean.  Maybe next time.  On this trip we hiked the edge of the crater. (I think it was a 4 mile round trip)  Destination, Jaggar Museum, (hoping to see Mick there, ha ha, but all we saw were displays of history and seismic activity graphs, etc)

Hope this doesn't erupt, now!

The volcano is a "must see" and being a "foodie"  I was more than eager as we veered into a rest stop/bakery on the way and BACK (It was that good!) for lunch and a snack.  One minor problem was that I was "in maintenance" on my diet plan and what appeared before me was definitely not on the plan.  I snapped a few pictures and triumphantly stepped away from the display case, empty handed.  How was I to know that my hubby was experiencing a sweet tooth meltdown!  What he chose, I would not have chosen, but, he needed help so I took a bite or two of his blueberry turnover!  Amazing!


Can I have one of each?!!


If you're ever in the area you need to stop at the Punalua Bake Shop which is the southernmost bakery in the USA.  It warranted a second visit on the return trip!

Making it back to our friend's condo in Kailua-Kona area, we stopped briefly, shared some libation on the deck overlooking the ocean and then set off for the return trip North to our hotel.  The sun was beginning to show its colors as it sank into the ocean.  Another beautiful finish to an adventurous day!

But wait!  On the way back we happened upon an eating place that served some of the best fish tacos I've had in a long time.  It was an unassuming place on the harbor just south of the airport. "Bite Me"  was the name of the place!   It looked like some one's backyard with red picnic tables scattered around the area.  Not much ambiance but my tacos made up for it.   If you're looking for great fish tacos at a more than reasonable price ($2.50 each!) check this place out.

After a days "rest" with only beach activities, walking, snorkeling, swimming with turtles, we headed back out in a different direction, this time to Hilo.  More in Part 4 of the BEST of the Big Island!  

Wednesday, May 11, 2011

Chocolate Blueberry Almond Bark Candy


As promised, I saved "the best" for last.  The last of the chocoley chocolate that is!  This company was kind enough to send me a review package of their finest chocolate products.  So, I proceeded to test them.  I have to say, it was some of the best tasting ever.  I set out to prove that chocolate goes with and in everything!  Of course, I tried chocolate covered strawberries, chicken mole and a new favorite, chocolate blueberry biscotti! 

Extra dark chocolate covered berries

Chocolate chicken mole

The best blueberry chocolate biscotti!

But, the best, by unanimous decision was the chocolate blueberry almond bark that I made for a Mother's Day treat.  It brought smiles and wide eyes to everyone who tried it.


Mom with her blueberry chocolate candy...all smiles!

I'm even seriously considering packaging it for sale.  Yes, it was that good!

Not photogenic but delicious!

The candy making was relatively simple.  I used Chocoley Bada Bing Bada Boom dark chocolate melts.  One batch consisted of:

2 cups chocolate melts

3/4 cup chopped unsalted roasted almonds

3/4 cup dried blueberry flavored cranberries

The great thing about Chocoley Chocolate company is that their website was extremely helpful with different recipes and candy making techniques.  I'm new at candy making so each visit to the website was a revelation!  Back to the bark!

Using a microwave and "safe" container, microwave the chocolate for one minute at 50% power.  Remove and stir with a spatula.  Return to the microwave for increments of 15-20 seconds until almost melted stirring each time.

Have a baking sheet covered with waxed paper ready, plus your other ingredients, all two of them.  So simple!  I added the almonds and blueberries to the melted chocolate, stirred and poured the mixture out onto the covered baking sheet.  Work quickly while spreading it to desired thickness.  Place in the refrigerator to cool and harden. Voila!  Remove after hard and break into pieces.

Again, I'd like to thank Chocoley for letting me share their product with my readers...It's been fun and chocolicious!

Remember to get your discount when ordering from their website using the code:WENDYSFAV15.  This offer expires in a few days 5/15/2011.  They also have a free email molding class you can take advantage of.  Link at the bottom.

http://www.chocoley.com/

www.facebook.com/bestchocolate

www.twitter.com/chocolatesupply

For chocolate molding course

http://chocoley.com/makingcandy/moldingcourse/moldedchocolatecandyclass.htm

Sunday, May 1, 2011

Chocolate Blueberry Biscotti


My home still has the distinctive aroma of heaven!  Yesterday I decided to create some biscotti from the Chocoley Chocolate that I'm reviewing.  It takes alot of willpower not to just devour it right out of the bag!  I figured I'd better get the harmless dark brown morsels  baked into something quick.  I'll "hide" them in some biscotti!

The only problem was that this recipe adapted from "the cook's tour" desperately needed chocolate and I had just the stuff to use.  Chocoley's new product is a fair trade, organic and 65% dark chocolate.  Perfect for baking as I proved with these aromatic chocolate blueberry biscotti.

Ingredients:

1/2 cup toasted chopped hazelnuts

1 cup sugar

2 tsp baking powder

2 cups plus 2 Tbsp flour

2 large eggs, for batter

1 egg for brushing the tops, lightly beaten

2 Tbsp vanilla

1/2 cup blueberry flavored craisins or dried blueberries

1/2 cup Chocoley fair trade organic chocolate, crushed into pieces

2 Tbsp water (depending on dough consistency)

Method:

Preheat oven to 350 degrees.

In a large bowl, hand mix the toasted hazelnuts, sugar, baking powder, flour and chocolate.

In a smaller bowl, stir eggs and vanilla until blended.  Add to the flour mixture.  Throw in the blueberries and stir.  Flour your hands and start to work with the dough.  It will be very sticky, but, I promise you it will begin to come together.  (I added about 2 Tbsp of water to bring it together, however, this could be due to the altitude difference.)  Once that happens, form a ball, and cut in half.

After the mixing - almost ready

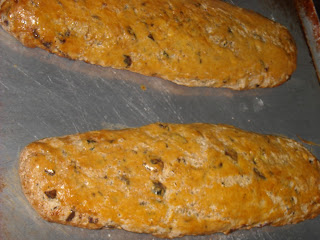
On a floured surface, roll one piece into a loaf shape about 12 inches long, 3 inches wide and 3/4 inch high.  Do the same with the remaining dough piece.  Place the "loaves" onto a baking sheet.  Brush with the beaten egg.

After baking for 40 minutes

Bake for 40 minutes, turning the baking sheet around halfway through.   The loaves should be a golden color.  Remove and cool for about 20 minutes before slicing.  Use a metal spatula to remove without breaking and slide them onto a cutting surface.  Use a serrated knife and cut into 3/4 inch pieces.   Each loaf should yield about 14 slices.  At this point you should "test" 2 and then you''ll  have an even dozen per loaf.  That's optional but highly advisable!  You're almost done.

Now, place the slices back onto a parchment covered baking sheet on their sides.  Reduce the oven to 200 degrees and bake for an additional 20 minutes to harden them.  I chose to only cook them for another 10 minutes.  I prefer them more on the chewier side vs. hard.  Remove from the oven, cool and then store in a tin or airtight container.  That way they'll keep for almost a month.

Tucked away in their tin.  They won't last a month around here!

I can't tell you how great these turned out.  You should have been there!

http://www.chocoley.com/
www.facebook.com/bestchocolate
www.twitter.com/chocolatesupply