Thursday, June 28, 2012

Dover Sole with Avocado Mango Salsa


Dover sole is a fish that frequents my kitchen.  Why?  Because it's so versatile, inexpensive and just plain good no matter what you do with it.  It is very mild in flavor and texture and prepared simply, it melts in your mouth!

The avocado mango salsa was incredible!  I'll be making that again for tacos, dip or quesadillas.  It was that great!

Avocado Mango Salsa

This is better made ahead and allowed to chill in the refrigerator.

1 mango, peeled, cored and diced

1 avocado (ripe but not mushy), peeled, cored and diced

1/4 cup diced red onion

1 tsp or more of jalapeno, minced

1/3 of a lime, juiced

2 Tbsp fresh cilantro, chopped

Mix all the above ingredients and it's ready!

Dover Sole

I like to cut the sole into 4 inch pieces.  Sprinkle with salt and pepper, dredge in a bit of flour on both sides.  Melt 2 Tbsp butter into a 12 inch non-stick skillet.  On medium high heat, place the fish fillets in and cook for about 3-4 minutes on both sides.  Other fish can be used, however, if thicker, cook longer.  Serve immediately and garnish with the avocado mango salsa.

Note:  No quantity given for fish or flour.  For 2 people I used 1/2 lb or less of fish and maybe 1/2 cup of flour for coating.

Monday, June 25, 2012

Eggplant Parmesan on the Grill!


What's on the grill, now?  I  think most people are intimidated by eggplant or they don't know what to do with it, but it's one of my favorite vegetables.  Growing up, my family never prepared it...not sure why.  Maybe, because at family gatherings one of the Italian inlaws would bring over the best eggplant parmesan casserole which was pretty hard to compete with.  Years would go by without another eggplant "exposure".

Then, I married an Italian and eggplant seemed to be part of the package.  Lucky me!  I learned several different ways to prepare the purple football shaped veggie.  And, a few I made up myself along the way.  Just recently, though, a lot of grilling has been going on over here.  Why not grill an eggplant?  And make it appear like a casserole?  We did, and it turned out wonderful.

1 eggplant, cut into 1/4 inch slices

2 pieces of heavy duty aluminum foil measuring aprrox 18 " in length

sprinkle of salt and pepper

1 cup diced Muir Glen organic tomatoes with basil & garlic (my choice)

drizzle of olive oil

about 4 oz. sliced mozzarella

First, spray the bottom of one piece of foil with pan spray.  Begin to layer the eggplant, making about 4 rows or so.  Sprinkle with salt and pepper, add the tomatoes (scatter) and drizzle olive oil on top.  Seal all the ends by rolling and crimping.  Place on the grill for about 30 minutes.  Carefully open the edges and layer the cheese on top of the eggplant.  Loosely close (no need to crimp edges).  The heat and steam will melt the cheese.  Remove and serve immediately.   This was a meal in itself....very good!


Thursday, June 21, 2012

Pasta Carbonara - Pasta of the Month


I don't know about you, but I look forward to my "pasta of the month post".   Frankly, I could make and eat pasta every day, if allowed.  My waistline does not permit me to indulge in such comfort food!  In my next life, I need to come back as an Italian living in the coastal regions of "the "boot".  That way I can have the best of both worlds, seafood and pasta, with an occasional pizza thrown in!

I'm surprised I've never made this classic dish sooner.  It comes together in about 20 minutes and is decadently good.  The thought of beaten eggs whisked in at the last minute scared me a bit, but so does the raw eggs in caesar salad dressing!  And there's always sushi, but I won't go into those stories!

I adapted this recipe from the Food Network.  I'm not a bacon in the morning  person (unless swirled into chocolate ice cream), so I used panchetta, not that it matters much.  They are still practically the same except for the way they are prepared and cured.  This is a great pasta dish.  It deserves more recognition!

Pasta Carbonara  (2 large servings, can easily be doubled or tripled)

1/2 cup chopped panchetta

1 Tbsp chopped garlic

black pepper

approx 1/2 lb spaghetti or fettucine, cooked

2 large eggs, beaten

salt (if you must, but not necessary with panchetta)

1/2 cup Parmesan or Romano cheese, grated

1 Tbsp chopped Italian parsley

On medium heat, in a large saute pan, cook the panchetta with a drizzle of olive oil until crisp.  Remove from the pan and drain on a paper towel.  Use about 1 1/2 Tbsp of the oil from the panchetta and toss the rest.  Add the garlic, then the pepper, only cooking for 30 seconds, or so.  Add the panchetta back in and the drained pasta.  Cook for another minute, while stirring.  Add the salt to the eggs.  Important:  Remove the pan from the heat and add the eggs, whisking briskly until the eggs thicken, being careful that they don't scramble.  Add the cheese, stir and garnish with the parsley to serve.  Very tasty!!  You can almost transport yourself to Rome with this one!  Enjoy!


Entrance to the Vatican

Tuesday, June 19, 2012

Apricot Ginger Salad Dressing


As promised, here's the apricot ginger homemade salad dressing that was mentioned in the previous post.  How did I not know how easy and inexpensive making my own salad dressing could be?  ALL these years, and they are many, I've been searching for the tastiest, healthiest drizzle for my salads.  I had it all along.  "There is no place like home"!

Instead of bottled dressings and marinades, which can be quite costly and filled with names you can't pronounce, try this recipe.  You WILL like it!  Most of the ingredients are probably already in your frig and pantry.  If not, use your imagination and taste buds to improvise.  Instead of apricot, try strawberry.

Apricot Ginger Salad Dressing or Marinade

1/2 cup apricot spreadable fruit or jam

3 Tbsp balsamic vinegar (I used pomegranate flavor)

1 1/2 Tbsp honey

1/2 Tbsp spicy brown mustard

1/2 tsp garlic powder

3 Tbsp canola or olive oil

1/2 cup apricot nectar (Usually in the juice or Mexican section)

1 Tbsp zested fresh ginger

salt and pepper to taste (if needed)

Put all the ingredients into a large measuring cup and whisk.  Then put into a nice jar and refrigerate until time to use.  This makes 8 fl oz and is enough for many salads.

Monday, June 18, 2012

Father's Day Feast


For Father's day this year we invited some talented caterers over to work their magic!  Actually,  my son and his beautiful girlfriend showed up, once again, with a feast for the father's.   Most of the prep work was done, all I had to do was provide an appetizer and make a salad!  How nice!


They prepared a Hawaiian theme barbecue with marinated and grilled skewered shrimp, grilled sweet potato fries and grilled juicy pineapple.  Children can be such a blessing and these two, although not children, are  truly a gift.  Everything was delicious!   To complete the day and the Hawaiian theme, simple ice cream cones!   More new flavors!   A butter yellow colored Persian  ice cream with  floral rosewater, a hint of earthy saffron and pistachios!  Then a Hawaiian rocky road, dedicated to my husband's father who passed over 25 years ago.  It was always his favorite!   He would have loved his grandson's ice cream making ability!  I know my dad did!


My contribution to the menu was garden salad made with more spinach from my garden, and a new edition to my line of homemade salad dressings.  Apricot Ginger.  I'll post the recipe tomorrow.

Thanks, again, to Jeremy and Leilani for being such gracious, creative and talented human beings, who selflessly honored their dad and grandfather with their Father's Day Feast and just their presence!  I Love you!

And I especially love my husband who is the greatest hubby and father, and my dad (above) who has always been there for me.  I appreciate you, both!

Thursday, June 14, 2012

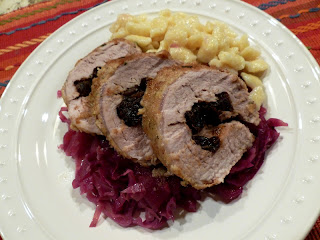
Healthy Czech Cabbage


This is for all those of Bohemian descent...I know you're out there somewhere.   And if you're not a part of this beautiful, proud heritage, you can eat like one!

My grandmother on my dad's side used to bring over a pot of steaming thick red cabbage most of the times we got together.  I have to admit, I tolerated the cabbage, but always had seconds on her sauerkraut.  The best!   As we get older our tastes change, and now, I wouldn't turn down her savory red cabbage.  This is not her recipe (that goes in the book) but it's a healthier alternative.

One of the ingredients in her cabbage was, of course, shortening, or lard.  Times have changed, and there are many ways to "lighten" old recipes without sacrificing flavor or the integrity of the whole Bohemian experience.  Enter my healthy Czech cabbage.

Czech Cabbage

Ingredients:

1 apple, peeled, cored and chopped

2 cups thinly sliced red cabbage

1/2 tsp caraway seed

1 package of Truvia

1/3 cup water

Put the above into a large pot and bring to a boil, stirring.   Cook, covered,  for an additional 10-15 minutes on medium/low heat.   Add the following:

1/4 tsp salt

1/2 tsp garlic powder

1 Tbsp coconut oil (secret ingredient)


The longer you let this simmer, the better the flavors, but you can serve after cooking for 10 more minutes.  Serve with sauerkraut, roast pork or chicken.  Yum!


Serve with roasted pork and spaetzle or dumplings


Monday, June 11, 2012

Bounty from my Garden


Not yet!  One of my favorite movies is "Field of Dreams", not because Kevin Costner is in it, although it helps the storyline!  I love the message, "build it and they will come".  I equate that to planting my garden, especially here in Northern Nevada.  We've had several mini freezes since I planted.  And I'm sure we were quite a sight to our neighbors as we ran around the backyard covering tomato plants and seedlings, and carting potted ones into the garage for a night or two.  But, it's beginning to pay off.  My 8 tomato plants are thriving, finally!  "Plant it, and they will grow"!

I was a little ambitious this year.  I knew I wanted a bigger planting space than in the past.   My husband spent several weekends building the nicest raised garden beds!   To me, they are a thing of beauty.   Thanks, babe!   I appreciate all your hard work! 

So, the nurturing and waiting begins.  There is nothing better than to go out and snip some herbs, thin the lettuce or arugula and pop it in my mouth!  Weird, I know...    A great crop of spinach has yielded quite a few salads!  On a sour note the swiss chard was "pulled" from the lineup and replanted with Japanese eggplant.  Evidently, the seeds were bad or something ate them while I was sleeping.  Something with two long ears and a cottontail?
(see above)

Oh well, soon there will be plenty for all of us, including friends, family and freezer.   I'm already planning recipes with the future bounty!  Here's a few pictures of the process so far.

The beginning!

Two beds - week 2   Then there was three.
The second of three snow storms!

And a side order of fingerling potatoes


Saturday, June 9, 2012

Basically Bread Pudding


So, what does a family of two do with a package of 8  hamburger buns?  First night, barbecued hamburgers, of course.  Then, to freeze or not to freeze...  NOT.  There's alot you can do with day old bread, you know, the kind you don't want for a sandwich.  You can make croutons, make my panzanella pasta or a strata.  But, my go to dessert happens to be a simple bread pudding.  I usually can't mess that one up.

I used sesame seed buns because that's what I had, but, I still like the rustic French or country bread.  The texture has just the right amount of crunch followed by the custard like goodness!  I used this recipe from Williams Sonoma and cut it in half.  I didn't want just the two of us gorging on bread pudding for days.  This adjustment makes at least 4-6 servings in a 8x8 pan.

Bread Pudding 

About 4 hamburger buns or the equivalent of 6 slices of bread, cubed

2 eggs

1/4 cup packed brown sugar

1/2 tsp vanilla

1/4 - 1/2 tsp cnnamon

pinch of fresh ground nutmeg

pinch of salt

2 cups of milk

1/8 cup cranberries or raisins (I used dried blueberry craisins)

  Preheat oven to 350 degrees.  Butter an 8 inch square baking pan.  Put the bread cubes in it.

In a bowl mix the eggs, brown sugar, vanilla, cinnamon, nutmeg and salt using a whisk.  Add the milk and whisk again.  Pour this over the breadcrumbs and let it sit.  Press the bread crumbs into the egg mixture a few times to absorb the moisture a bit.  About 15 minutes.

Toss on the fruit of choice pressing gently to submerge slightly.  Put the baking dish into a larger shallow roasting pan.  Add very hot water to halfway up the sides of the dish.  Bake until done.  A knife inserted into the middle will come out clean.  Baking time should be about 45-55 minutes..

You can serve with a sprinkling of powdered sugar, ice cream, a warm amaretto sauce or all of the above!  It's great chilled also. 

Wednesday, June 6, 2012

Mexican 7 Layer Dip


Who says you have to have a big production for dinner?  Since the birth of this blog, I have to admit, we haven't had the same meal very often over the last two years!  Just thinking about that makes me tired!  So, another lazy girl dinner is what's on the menu.

About 30 years ago I tasted my first 7 layer dip.  You know the one, with beans, cheese, olives, onions, tomatoes, guacamole and sour cream.  Layer it all and dig in!  To make it a little more substantial, I added some ground beef, but actually I like it with just the beans.  To compliment this "meal", of course, you MUST have a margarita or two!  What's Mexican food without those?  It's like Italian food without wine!  Right?  And add something healthy, like cantaloupe slices and call it a dinner!

Mexican 7 Layer Dip

1/2 lb ground beef (optional)

a dash of chili powder

a dash of garlic powder

1 can black or refried beans.  If leaving out the meat add another can of beans

a mix of red onion and green onions (1 cup or so)

1 chopped tomato

1 small can of sliced black olives

guacamole (make your favorite recipe)

1 cup grated cheddar or jack or a mix of both

1/2 cup of salsa or picante sauce

a dollop or two of sour cream

If you want the meat version brown the ground beef in a skillet with chili powder and garlic powder.   Add 1 can of beans, red onions and stir.  Pour the meat/bean mixture into a serving glass pie plate.  Start to layer the remaining ingredients.  I don't think there is a proper order for this layering process.  Use your imagination!  When done, serve with chips and that margarita!  Ole!

Note:  No sour cream in this one.  Hubby doesn't care for sour cream unless I "hide it" in a recipe.  I'll never tell...

Sunday, June 3, 2012

Springtime Frittata


I love the bounty that arrives with Spring.  Fresh artichokes, asparagus, strawberries, etc.  For those of you who don't know what a frittata is, it just means omelet in Italian.  What's great about a frittata is that you can throw almost anything in there and it will come out nicely.  I used pre-roasted garlic, pre-cooked asparagus, frozen artichoke hearts and then all the basics. 

Frittatas are wonderful breakfast or brunch items, served room temperature, warm or cold.  If you can scramble eggs, you can make an elegant frittata!

Ingredients:

6 eggs

1-2 Tbsp half and half

salt & pepper to taste

1/4 cup Parmesan cheese

1 leek, a 3 inch piece, sliced

1/3 red onion, sliced, then chopped

1 cup artichoke hearts, partially frozen or thawed

1 cup asparagus pieces (1 inch long), parboiled or microwaved briefly

2-3 cloves of roasted garlic, chopped

2 Tbsp butter

1 Tbsp olive oil

In an oven proof nonstick 10-12 inch skillet, put the olive oil, leeks, red onion and artichoke hearts in and saute for about 10 minutes.  Add the asparagus,  and garlic, stir and remove from the heat.  Meanwhile in a small bowl mix the eggs, half & half, salt and pepper and 1/8 cup of the Parmesan.

 Add the butter to the skillet with veggies.  When it melts,  add the egg mixture to it.  The heat should be on low-medium.  Gently move the eggs away from the edges with a spatula (almost like you're scrambling eggs, but not so vigorously) until it's almost cooked.  The middle will still be runny.  Sprinkle the rest of the Parmesan on top and place the skillet into the broiler (on low)  Cover the handle with foil if it's not oven proof.  Broil until firm and slightly browned.  Cool and slide the frittata onto a serving dish.  It can be served immediately or refrigerate for later use.  It's even better the next day!